Frequently Asked Questions
General
How to use the Lmod Environment Module System for enabling applications
If you want to run applications on the cluster and the application servers, you have to enable the application environment with the Lmod Environment module system. The environment module system is a replacement for sourcing the sourceme files for different applications. To see which applications modules are available, you can run the command:
[somebody@qce-apps01 ~]$ module avail

---------------------------- /opt/apps/modulefiles -----------------------------
   ASM/2018            Vivado/2019.1              devtoolset/7
   ASM/2019     (D)    Vivado/2019.2       (D)    devtoolset/8     (D)
   IC/2018             cuda/9.1                   matlab/R2018b
   IC/2020      (D)    cuda/10.0                  matlab/R2019b    (D)
   SDx/2019.1          cuda/10.1                  mumax3/3.10b2
   TCAD/2017           cuda/10.2           (D)    questasim/10.6
   TCAD/2018           cudnn/10.0-7.6.5.32        questasim/10.7
   TCAD/2019    (D)    cudnn/10.1-7.6.5.32        questasim/2019.4 (D)
   Vitis/2019.2        cudnn/10.2-7.6.5.32 (D)

  Where:
   D:  Default Module

Use "module spider" to find all possible modules and extensions.
Use "module keyword key1 key2 ..." to search for all possible modules matching
any of the "keys".
You see all the application modules and versions available. The default versions are marked with a (D) after the name. The newest application versions will always become the default. Default application versions can be activated without specifying the version. To enable the latest available matlab version, you type:
[somebody@qce-apps01 ~]$ module load matlab
[somebody@qce-apps01 ~]$
If you want to run version R2018b of matlab you type the command:
[somebody@qce-apps01 ~]$ module load matlab/R2018b
[somebody@qce-apps01 ~]$
You can type matlab on the commandline and version R2018b of matlab will start. If you have loaded the environment of a specific app version and want to load another version, you just type the module load command with the version you want to run and the version is replaced. In this case matlab R2018b is replaced by matlab R2019b:
[somebody@qce-apps01 ~]$ module load matlab/R2018b
[somebody@qce-apps01 ~]$ module load matlab

The following have been reloaded with a version change:
  1) matlab/R2018b => matlab/R2019b

[somebody@qce-apps01 ~]$
If you want to see which modules are currently loaded you can run the module list command:
[somebody@qce-apps01 ~]$ module list

Currently Loaded Modules:
  1) matlab/R2019b


[somebody@qce-apps01 ~]$
To unload a module (i.e. the matlab module), you type the module unload <module> command:
[somebody@qce-apps01 ~]$ module unload matlab
[somebody@qce-apps01 ~]$ module list
No modules loaded
[somebody@qce-apps01 ~]$
You can also load multiple modules as long as they are from different application families:
[somebody@qce-apps01 ~]$ module load Vivado questasim/10.7
[somebody@qce-apps01 ~]$ module list

Currently Loaded Modules:
  1) Vivado/2019.2   2) questasim/10.7


[somebody@qce-apps01 ~]$
Some modules have a dependency on other modules, i.e. the mumax3 application is dependent on cuda version 10.0. The cuda 10.0 version has to be loaded first:
[somebody@qce-apps01 ~]$ module load mumax3
Lmod has detected the following error:  Cannot load module
"mumax3/3.10b2" without these module(s) loaded:
   cuda/10.0

While processing the following module(s):
    Module fullname  Module Filename
    ---------------  ---------------
    mumax3/3.10b2    /opt/apps/modulefiles/mumax3/3.10b2.lua

[somebody@qce-apps01 ~]$ module load cuda/10.0 mumax3
[somebody@qce-apps01 ~]$
These examples are enough for basic usage of the Lmod Environment module mystem. If you want to have more information, please consult the Lmod User Guide.
How to setup X2Go for the qce-xportal server
X2Go enables you to access a graphical desktop of a computer over a low bandwidth (or high bandwidth) connection. You can connect from any computer running Linux, Windows or macOS. To use X2Go you have to download and install the X2Go client software from the X2Go webiste. You can find the X2Go installation instructions here.
Note
If you want to connect to the X2Go server from outside the TU Delft, you have to setup a VPN connection first.
Start the X2Go client after installation and you will get a session preferences dialog to create a session profile for the Q&CE X2Go server qce-xportal. Please click on the images below if you want a bigger version.
In the Session tab, you fill in the following mandatory fields:
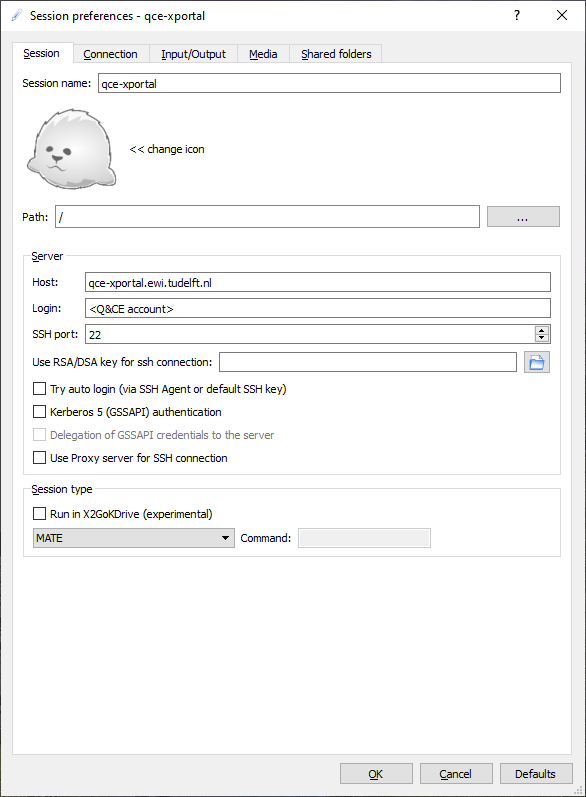
Session name |
qce-xportal |
Host |
qce-xportal.ewi.tudelft.nl |
Login |
<your Q&CE accountname> |
Session type |
MATE |
In the Connection tab you select your connection speed:
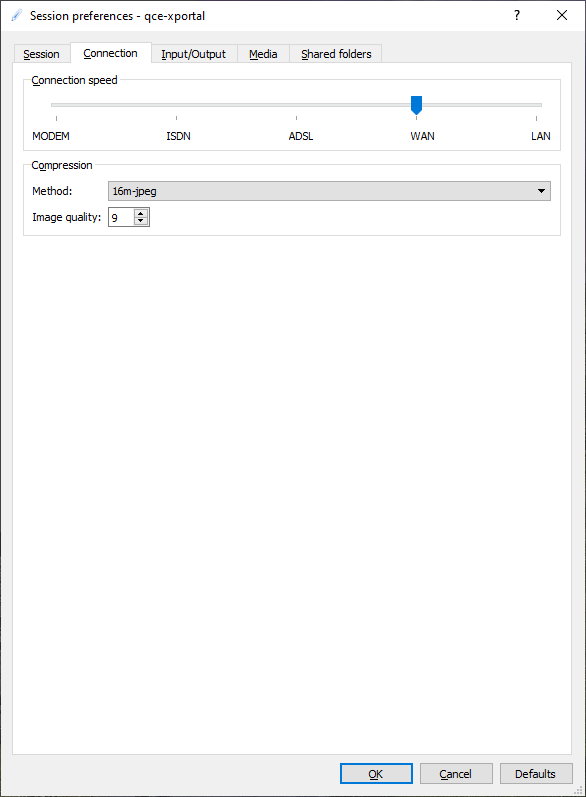
ADSL |
low speed connection < 10 Mbps |
WAN |
medium speed connection > 10 Mbps |
LAN |
high speed connection > 100 Mbps |
In most cases WAN will be the best option for a connection from home. If you are in the TU Delft network, you can select LAN.
In the Input/Output tab you can set your screen and keyboard options:
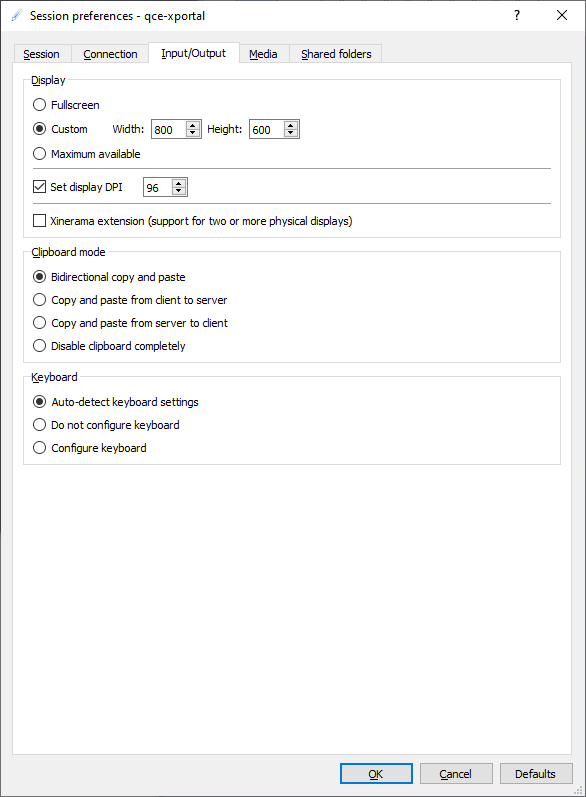
Select your X2Go initial display size. You can resize the X2Go display window when the desktop is started. If the fonts on the connected linux desktop are too small or to large, adjust the DPI setting. The default keyboard and clipboard settings are mostly OK.
In the media tab you can set sound and printer options:
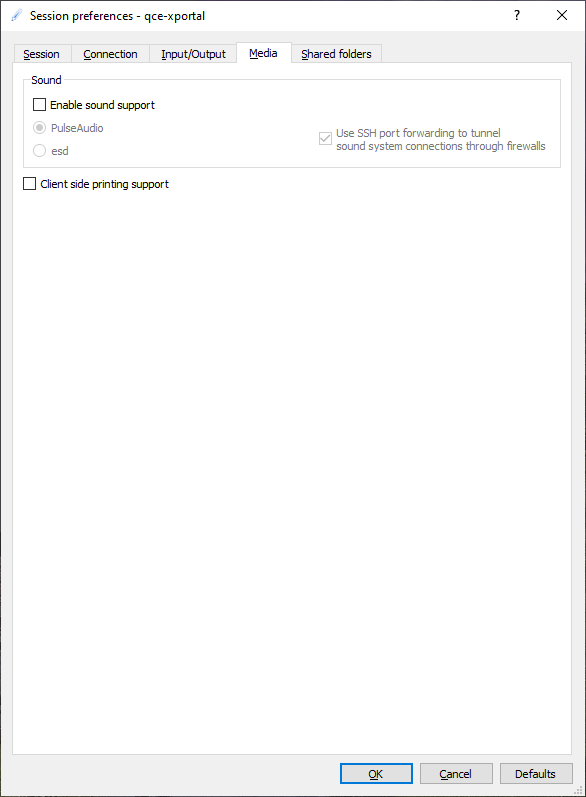
Disable sound and printer support.
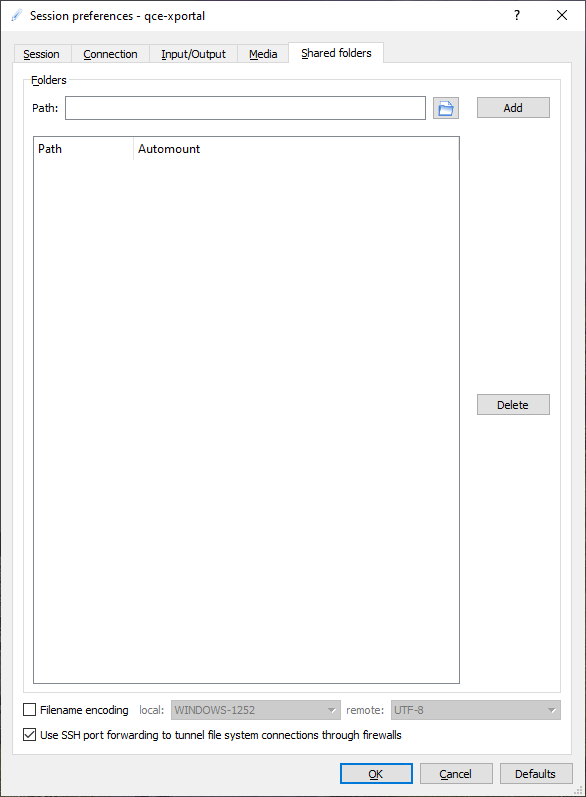
In the Shared folders tab you can setup local shared folders:
The session profile for qce-xportal is ready now, so click OK to end the session preferences. The X2Go client is ready to make a connection and will show the following window:

Click on the session name qce-xportal to open the connection dialog:
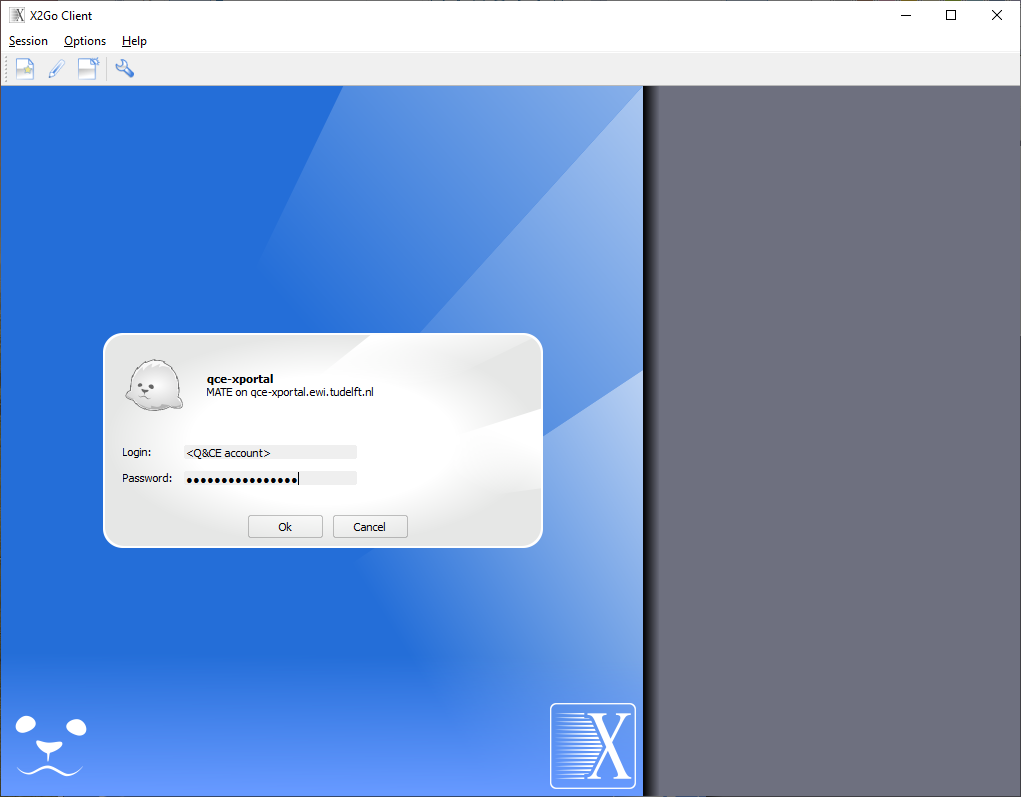
Enter your password and press OK to start the connection to qce-xportal. During the connection you can be asked to open certain firewall ports in your OS. Please allow this for the X2Go client to work correctly. You can get a message about host key verification of server qce-xportal:
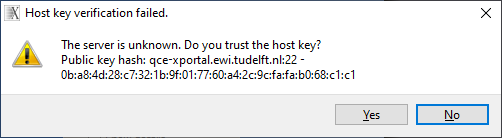
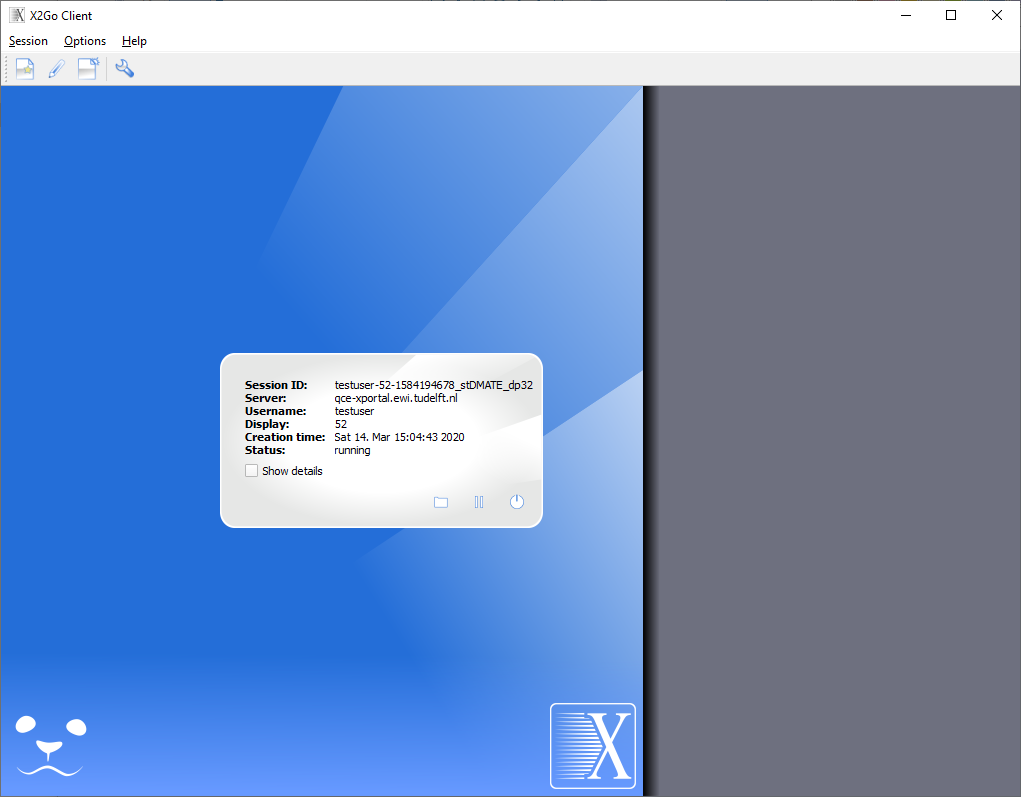
Press Yes to trust the host key and the connection to the X2Go will continue. A new window with the linux desktop of the qce-xportal server will appear and the client status will report running:
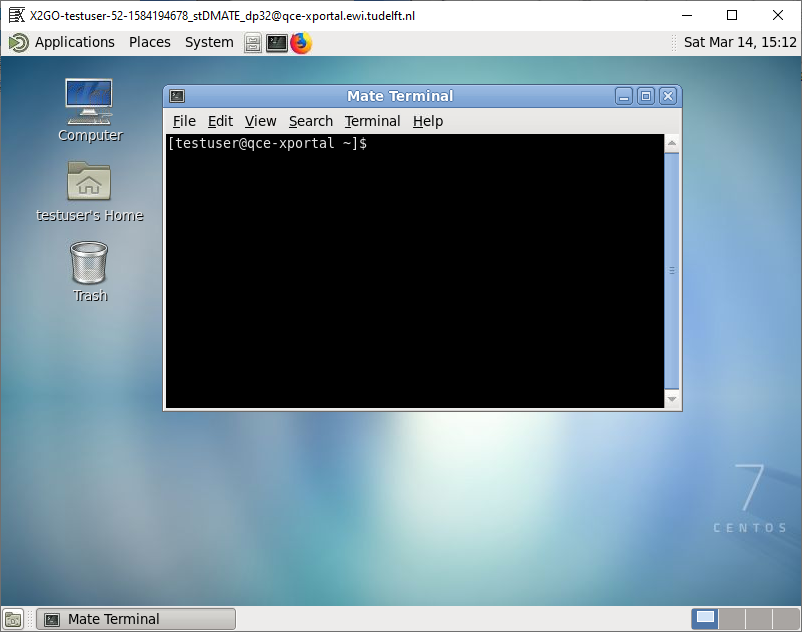
On the linux desktop you can open a terminal and ssh to the server where you want to start your application:
When you are finished with your X2Go session you have two options.
Terminate the session by logging out of the desktop
Click on the System menu and select Log out <user>:
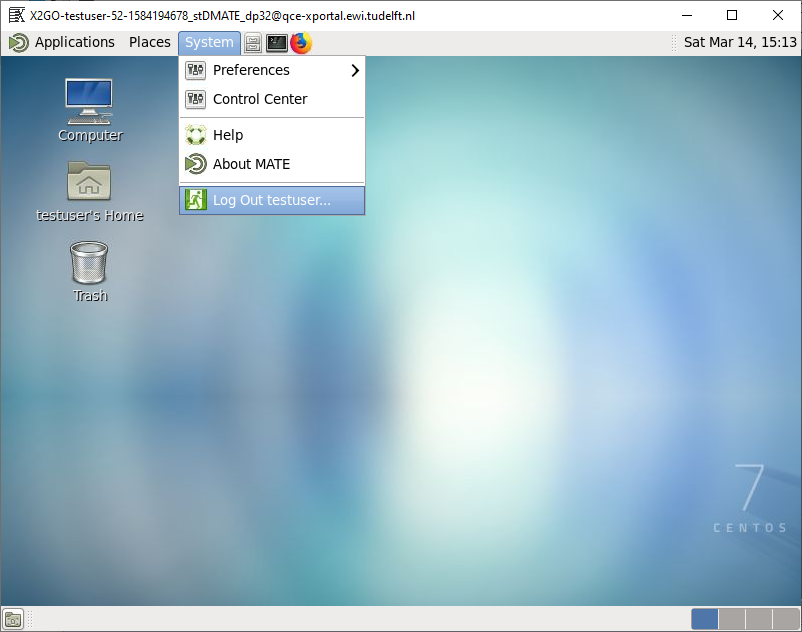
This is the preferred way of ending your X2Go session. If you still have an X application running with a simulation you also have the option to suspend your session.
Suspend the session by closing the window
Click on the window close button:
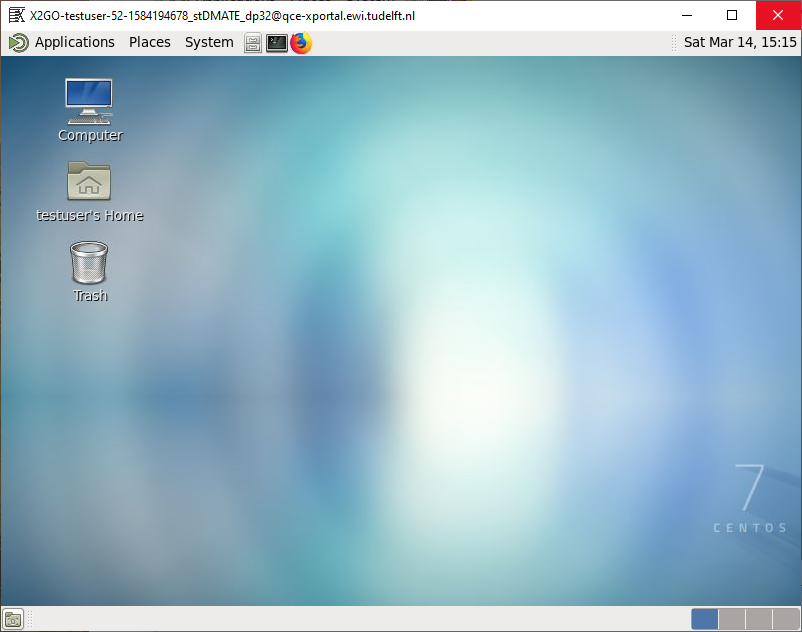
After the connection is suspended, you can reconnect to it with the X2Go client. This method is only to be used if you still have applications running when you want to end your X2Go session. The session will continue to run on the X2Go server and will use computer resources.
Warning
A suspended X2Go session will be terminated if you do not reconnect within 10 days!
Please Logout of the X2Go session if you have no need to suspend it!!!
You can also use the X2Go client to terminate or suspend a connected session with the Terminate  and Suspend
  button.
How to setup a python virtual environment
There are many different ways to setup a python virtual environment, which you can find on the web. This paragraph describes the use of python-virtualenv for python 2.7 and venv for python 3.6 on the cluster. The application server qce-apps01.ewi.tudelft.nl has the python-virtualenv and venv package installed. Make sure you are creating the virtual environment on a network share, such as your home or bulk share.
First we create a virtual environment base directory:
[somebody@qce-apps01 ~]$ mkdir ~/virt-env
Next we create the virtual environment for project ‘my-app’:
# Python 2:
[somebody@qce-apps01 ~]$ virtualenv ~/virt-env/my-app
New python executable in /home/somebody/virt-env/my-app/bin/python
Installing setuptools, pip, wheel...done.

# Python 3:
[somebody@qce-apps01 ~]$ python3 -m venv ~/virt-env/my-app
We can now use the python virtual environment for our project by activating it with the following command:
[somebody@qce-apps01 ~]$ source ~/virt-env/my-app/bin/activate
(my-app) [somebody@qce-apps01 ~]$
The virtual environment is now active. Notice the project name between parenthesis before the normal prompt. You can now install the python modules you need for your project. In the next example, the pyton module ‘NetworkX’ is installed with pip in the virtual environment:
(my-app) [somebody@qce-apps01 ~]$ pip install NetworkX
Collecting NetworkX
  Downloading https://files.pythonhosted.org/packages/f3/f4/7e20ef40b118478191cec0b58c3192f822cace858c19505c7670961b76b2/networkx-2.2.zip (1.7MB)
    100% |████████████████████████████████| 1.7MB 482kB/s
Collecting decorator>=4.3.0 (from NetworkX)
  Downloading https://files.pythonhosted.org/packages/bc/bb/a24838832ba35baf52f32ab1a49b906b5f82fb7c76b2f6a7e35e140bac30/decorator-4.3.0-py2.py3-none-any.whl
Building wheels for collected packages: NetworkX
  Running setup.py bdist_wheel for NetworkX ... done
  Stored in directory: /home/somebody/.cache/pip/wheels/68/f8/29/b53346a112a07d30a5a84d53f19aeadaa1a474897c0423af91
Successfully built NetworkX
Installing collected packages: decorator, NetworkX
Successfully installed NetworkX-2.2 decorator-4.3.0
You are using pip version 9.0.1, however version 18.1 is available.
You should consider upgrading via the 'pip install --upgrade pip' command.
(my-app) [somebody@qce-apps01 ~]$
You can run your python application from anywhere as long as the virtual environment is active. To deactivate the virtual environment, use the deactivate command:
(my-app) [somebody@qce-apps01 ~]$ deactivate
[somebody@qce-apps01 ~]$
If you want to run your python application with the virtual environment on the cluster, you have to activate it in the job script before starting your application:
#!/bin/bash

#SBATCH ...
#SBATCH ...
#SBATCH ...

# activate python virtual environment
source /home/somebody/virt-env/my-app/bin/activate
# start the python application
/shares/bulk/somebody/my-app/my-app.py
For more information about the pip command and virtual environments see the Python documentation site.
Q&CE Cluster
How to run MATLAB in batch mode on the cluster
You can run MATLAB R2018 and newer in batch mode on the cluster by providing a number of commandline options.
for single-thread batch mode:
matlab -singleCompThread -batch <matlab_command_file>
Single thread mode works best for most MATLAB simulations. If you do want to use multi-thread mode, use this command:
matlab -batch <matlab_command_file>
Make sure you limit the number of computation threads that MATLAB will use, with the maxNumCompThreads() command in your MATLAB command file:
% Set the maximum number of computation threads
N = 4;
LASTN = maxNumCompThreads(N);
You need to set the version specific environment files with the module command in your job file before you run the matlab command. You can find the supported MATLAB versions with the module avail command:
[somebody@qce-cluster-login ~]$ module avail matlab

---------------------------- /opt/apps/modulefiles -----------------------------
   matlab/R2018b    matlab/R2019b (D)

  Where:
   D:  Default Module

Use "module spider" to find all possible modules and extensions.
Use "module keyword key1 key2 ..." to search for all possible modules matching
any of the "keys".
Below is an example job script starting a single threaded MATLAB simulation:
#!/bin/bash

#SBATCH -J matlab-sim                  # Job name
#SBATCH -o matlab-sim.%j.out           # Name of output file (%j expands to jobId)
#SBATCH -p general                     # Use the "general" partition (default)
#SBATCH -n 1                           # Number of tasks/processes
#SBATCH -c 2                           # Number of cpus/threads per task
#SBATCH -t 3-00:00:00                  # Run time 3 days
#SBATCH --mem 4G                       # use 4GB

# load the MATLAB R2018b environment
module load matlab/R2018b
# cd to working directory
cd ~/<project>/
# run a MATLAB batch job which uses a single thread and 4GB of memory
matlab -singleCompThread -batch <matlab_command_file>
Warning
It is possible some MATLAB toolboxes do not comply to the maxNumCompThreads() command and try to use more CPU resources then specified. This may lead to very poor performance of your job, since the maximum CPU resource usage is enforced by the SLURM resource manager.
See the MATLAB documentation site for more help on MATLAB.
How to run Cadence Spectre on the cluster
Cadence spectre can be run on the cluster from within a ‘container’. This means all cadence dependencies are installed in a ‘container’ and the executable is started in the container. The cluster uses ‘Apptainer’ (former Singularity) containers which are developed for running batch jobs on HPC clusters (see Apptainer). There is a container for different versions of spectre available. Please check the directory /opt/ohpc/pub/singularity for available (spectre) containers.
To start the spectre version 2020 container and open a shell you have
[somebody@qce-cluster-login ~]$ apptainer shell /opt/ohpc/pub/singularity/spectre-2020.sif
Singularity>
The container environment is now active and you can run the spectre commands. The cadence spectre environment is already enabled in the container, so you can execute commands directly to test your simulation interactively. The ‘bulk’, ‘group’, ‘apps’ and ‘work’ filesystems are available in the container. Type exit to leave the container environment.
Warning
Due to the large number of Spectre licenses used during multi job cluster simulations, the total number of simultaniously usable licenses on the cluster is set to 200. To make sure this limit is never exceeded, please use the -L spectre:<nr-lic> or --license spectre:<nr-lic> options in the #SBATCH settings in your job script. Failure to set the license option may lead to a cap of spectre licenses for our department! Using Spectre in multithread mode will increase the license usage, so please specify the same number of licenses in <nr-lic> as the number of threads reserved for your simulation.
To view the current usage of spectre licenses on the cluster, use the scontrol show lic command:
[somebody@qce-cluster-login ~]$ scontrol show lic
LicenseName=spectre
    Total=200 Used=0 Free=200 Remote=no
Spectre usage recommendations
1 - Using local storage
The Spectre application is performing a lot of file I/O operations during runtime. When using the ‘home’ or ‘bulk’ NFS filesystems for your spectre input and output files, this will slow down your simulation and put a significant load on the fileserver. When running hundreds of spectre simulations on the cluster, this will put a huge load on the fileserver which is undesirable. The best way to avoid this is using the local ‘work’ filesystem on the cluster node for your spectre output and intermediate files. The ‘work’ filesystem is only available on the node, so you have to copy the results from your simulations to your ‘home’ or ‘bulk’ directory before the batch jobscipt is finished. After copying, you have to remove the results from the ‘work’ filesystem to prevent it from filling up. Please keep in mind that copying the results and removing the directory in the ‘work’ filesystem can take some time, so adjust your runtime in the jobscript accordingly. Use the Spectre -outdir and -rmrawfiles commandline options to specify the output directory and clean up all intermediate files.
Below you will find an example on how to use the local ‘work’ filesystem in your batch jobscript:
# Create a unique job directory in the local 'work' filesystem
mkdir -p /work/<username>/<job-name>
# Go to the spectre project work directory
cd /shares/bulk/<username>/<project>
# Run your spectre simulation with the 'work' filesystem as output directory
spectremdl -64 -design <design>.scs -batch <measure>.mdl -outdir /work/<username>/<job-name>/ -rmrawfiles +lqtimeout 30
# Copy the results from the simulation to the 'bulk' filesystem
cp /work/<username>/<job-name>/results <result-dir>/
# Remove the <job-name> directory from the 'work' filesystem
rm -rf /work/<username>/<job-name>
2 - Multithreading and APS
The Spectre application has the ability to use multiple CPU threads during runtime. This will speed up the simulation runtime in some cases, but can also slow it down due to Operating System overhead. In case of small designs use the single thread mode of Spectre, as this has proven to be the fastest mode. For larger designs you can set multithreading mode on and see if this will speed up your simulation. Below you will find the commandline options of Spectre which relate to multithreading:
+multithread      Enables the multithreading capability. When specified, the Spectre simulator
                  automatically detects the number of processors and assigns the appropriate
                  number of threads to use, see the 'options' help page for more information
                  on using multithreading. '+mt' can be used as an abbreviation of
                  '+multithread'.
+multithread=<N>  Enables the multithreading capability, where, N is the number of threads
                  specified. A maximum of 64 threads are allowed. '+mt' can be used as an
                  abbreviation of '+multithread'.
-multithread      Disables the multithreading capability.  By default, multithreading is
                  disabled for Spectre but is enabled for APS. '-mt' can be used as an
                  abbreviation of '-multithread'.
Spectre APS mode can also speed your simulation. By default multithreading is enabled when using APS, so please take this in account when specifying licenses. Below you will find the command line options regarding APS:
+aps    Enables APS mode.
++aps   Enables ++aps mode. Unlike the +aps mode, the ++aps mode uses a different time-step
        control algorithm compared to Spectre. This can result in improved performance,
        while satisfying error tolerances and constraints.
For more information on Spectre commandline options, run the spectre -64 -help command on the commandline. Basically the following simple rules apply for using Spectre:
Small design: use Spectre single threaded,
-mtand++aps. Use 2 spectre licensesLarge design: use Spectre multithreaded,
+mt=<N>and++aps. Use<N>spectre licenses
Warning
The use of the APS mode in your spectre simulations require at least 2 licenses for single threaded simulations, so use -L spectre:2 in your job script!
This is no exact science, so your mileage may vary. Below are the example jobscripts for starting the spectre simulations in single- and multithread mode with the singularity exec command.
Single thread spectre version 2020 jobscript example:
#!/bin/bash

#SBATCH -J spectre         # Job name
#SBATCH -o spectre.%j.out  # Name of stdout output file (%j expands to jobId)
#SBATCH -n 1               # 1 Task
#SBATCH -c 2               # 2 CPUs per task (HyperThreading)
#SBATCH -t 1:00:00         # Run time (hh:mm:ss)
#SBATCH --mem 1G           # Use 1G of mem
#SBATCH -L spectre:2       # Use 2 spectre license, due to APS usage

# Create unique job directory on local 'work' filesystem
mkdir -p /work/<username>/spectre-out-%j
# Go to spectre project work directory
cd /shares/bulk/<username>/spectre-project
# Start the spectre simulation
apptainer exec /opt/ohpc/pub/singularity/spectre-2020.sif spectremdl -64 -design design.scs ++aps -mt -batch measurement.mdl -rmrawfiles -outdir /work/<username>/spectre-out-%j/
# Copy the simulation results to the spectre project directory
cp -r /work/<username>/spectre-out-%j/* results/
# Remove the local job directory
rm -rf /work/<username>/spectre-out-%j
Multithread spectre version 2020 jobscript example:
#!/bin/bash

#SBATCH -J spectre-mt         # Job name
#SBATCH -o spectre-mt.%j.out  # Name of stdout output file (%j expands to jobId)
#SBATCH -n 1                  # 1 Task
#SBATCH -c 4                  # 4 CPUs per task (HyperThreading)
#SBATCH -t 1:00:00            # Run time (hh:mm:ss)
#SBATCH --mem 1G              # Use 1G of mem
#SABTCH -L spectre:4          # Use 4 spectre licenses

# Create unique job directory on local 'work' filesystem
mkdir -p /work/<username>/spectre-mt-out-%j
# Go to spectre project work directory
cd /shares/bulk/<username>/spectre-project
# Start the spectre simulation
apptainer exec /opt/ohpc/pub/singularity/spectre-2020.sif spectremdl -64 -design design.scs ++aps +mt=4 -batch measurement.mdl -rmrawfiles -outdir /work/<username>/spectre-mt-out-%j/
# Copy the simulation results to the spectre project directory
cp -r /work/<username>/spectre-mt-out-%j/* results/
# Remove the local job directory
rm -rf /work/<username>/spectre-mt-out-%j
For more information about ‘Apptainer’, see the Apptainer User Guide
How to run Xilinx Vivado in batch mode on the cluster
You can run Xilinx Vivado in batch mode on the cluster by providing a number of commandline options to Vivado:
vivado -mode batch -nojournal -nolog -notrace -source <command_file>.tcl
You also need to set the version specific environment files with the module command in your job file before you run the vivado command. You can find the supported Vivado versions with the module avail command:
[somebody@qce-cluster-login ~]$ module avail Vivado

---------------------------- /opt/apps/modulefiles -----------------------------
   Vivado/2019.1    Vivado/2019.2 (D)

  Where:
   D:  Default Module

Use "module spider" to find all possible modules and extensions.
Use "module keyword key1 key2 ..." to search for all possible modules matching
any of the "keys".
Below is an example jobscript for a Vivado 2019.1 batch run:
#!/bin/bash

#SBATCH -J vivado-2019.1           # Job name
#SBATCH -o vivado-2019.1.%j.out    # Name of stdout output file (%j expands to jobId)
#SBATCH -n 1                       # 1 task
#SBATCH -c 2                       # 2 CPUs per task (HT)
#SBATCH -t 4:30:00                 # Run time (hh:mm:ss) - 4 hours and 30 min
#SBATCH --mem 4G                   # use 4GB memory

# Set xilinx vivado 2019.1 environment
module load Vivado/2019.1
# Start the vivado run in the <project> dir
cd ~/<project>
vivado -mode batch -nojournal -nolog -notrace -source <command_file>.tcl
How to run NVidia CUDA and cuDNN programs in batch mode on the cluster
You can run your own CUDA or CUDA enabled programs in batch mode on the cluster nodes. To do so, you have to select the CUDA and cuDNN version (if applicable) you want to use. You can find the available version with the module avail command:
[somebody@qce-cluster-login ~]$ module avail cuda cudnn

---------------------------- /opt/apps/modulefiles -----------------------------
   cuda/9.1     cuda/10.2           (D)    cudnn/10.2-7.6.5.32 (D)
   cuda/10.0    cudnn/10.0-7.6.5.32
   cuda/10.1    cudnn/10.1-7.6.5.32

  Where:
   D:  Default Module

Use "module spider" to find all possible modules and extensions.
Use "module keyword key1 key2 ..." to search for all possible modules matching
any of the "keys".
The cuDNN library depends on the CUDA version, so pick the right one if you want to use it.
Below is an example jobscript for starting the CUDA accelerated mumax3 application, which depends on CUDA version 10:
#!/bin/bash

#SBATCH -J mumax3             # Job name
#SBATCH -o mumax3.%j.out      # Name of stdout output file (%j expands to jobId)
#SBATCH -p general            # Use default partition
#SBATCH --gres=gpu:1          # Use 1 GPU
#SBATCH -n 1                  # Number of tasks to run
#SBATCH -c 2                  # 2 CPUs per task (HT)
#SBATCH -t 1:00:00            # Run time (hh:mm:ss) - 1 hour
#SBATCH --mem 1G              # use 1 GB of mem

# load cuda 10.0 and mumax3 modules
module load cuda/10.0 mumax3

# cd to <project> subdirectory (if applicable)
cd <project>
# run mumax3 command (use the -cache "" parameters!!!)
mumax3 -cache "" <project>.mx3
The --gres=gpu:1 parameter will make sure your job starts on a compute node with a GPU.